
Learning how to play a trombone can be an exciting and rewarding experience. The trombone is one of the most expressive instruments in the brass family, known for its powerful sound and unique slide that allows players to smoothly change pitch. While the slide may seem confusing at first, the basic fundamentals are actually straightforward and can be learned step by step.
In this beginner guide, you will learn the essential skills needed to start playing the trombone, including how to assemble the instrument, hold it correctly, form a proper embouchure, and produce your first clear notes. You will also learn about basic slide positions, simple exercises, and a structured practice plan to help you build confidence and improve quickly.
With this article and many others, feel free to use the Trombone Resource Center for additional help
Let’s get started!
Disclaimer
The Trombone Mentor participates in the Amazon Services LLC Associates Program. This means that when you click on an Amazon link on this site and make a purchase, we may earn a small commission at no additional cost to you.
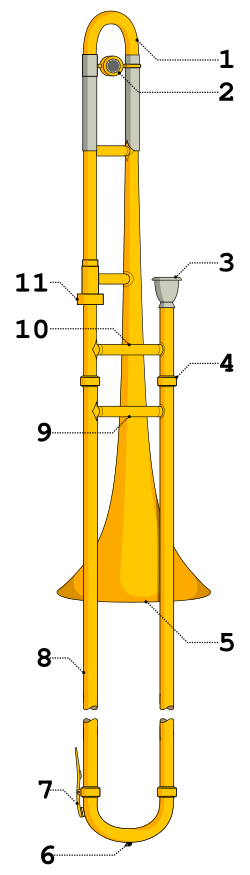
Understanding the Parts of the Trombone
Before jumping in and playing your trombone, it’s important to understand the main parts of the trombone. There are 11 basic parts to your trombone. Learn the names of these parts along with their functions.
1 – Tuning Slide
2 – Balance Weight
3 – Mouthpiece
4 – Slide Lock
5 – Bell
6 – Bumper
7 – Water Key
8 – Outer/Inner Slide
9 – Slide Brace
10 – Upper Brace
11. – Connector
Step 1: Assembling the Trombone
1. Hold the bell section with your left hand.
2. Carefully insert the slide section into the bell section.
3. Tighten the screw connector gently.
4. Insert the mouthpiece. Do not bang the mouthpiece with your fist. It will get stuck.
5. Make sure that the slide lock is in place so that your slide doesn’t get away from you.
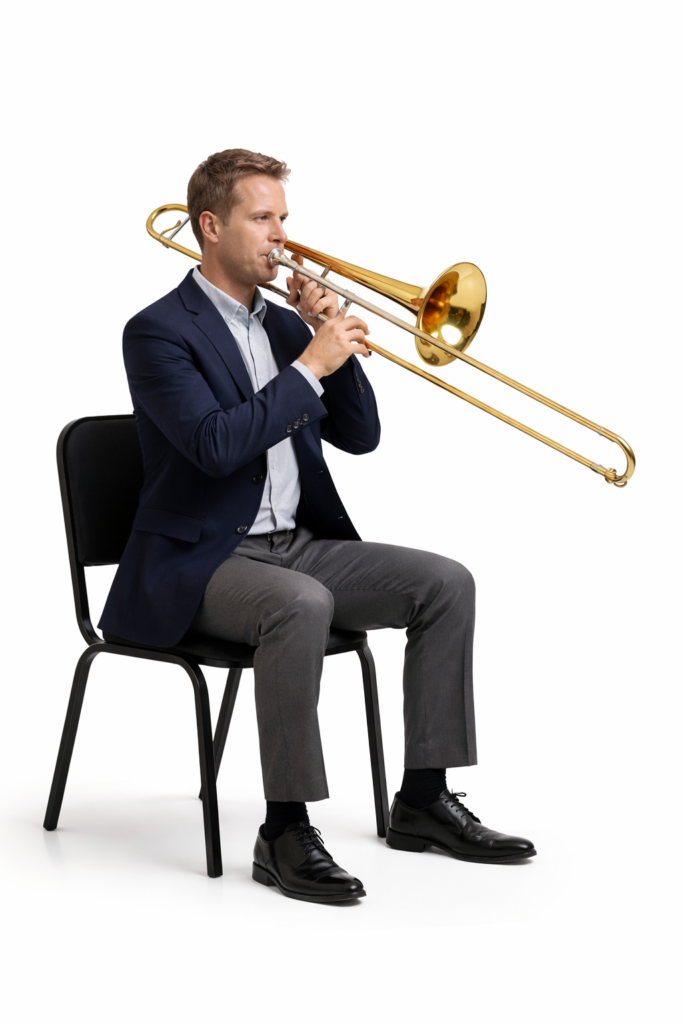
Step 2: How to Hold the Trombone Correctly
When holding your trombone, both hands and arms serve different rolls. Don’t let anyone tell you that playing a trombone isn’t a physical activity. Correct hand position is crucial for smooth slide movement and tone.
Left Hand Position
- Supports the weight of the instrument.
- Holds the brace near the mouthpiece.
- Keeps the trombone stable while playing.
Right Hand Slide Grip
- Use your thumb and first three fingers.
- Maintain a relaxed, light grip.
- Allows smooth, controlled slide movement.
- Avoid gripping the slide tightly like a fist.
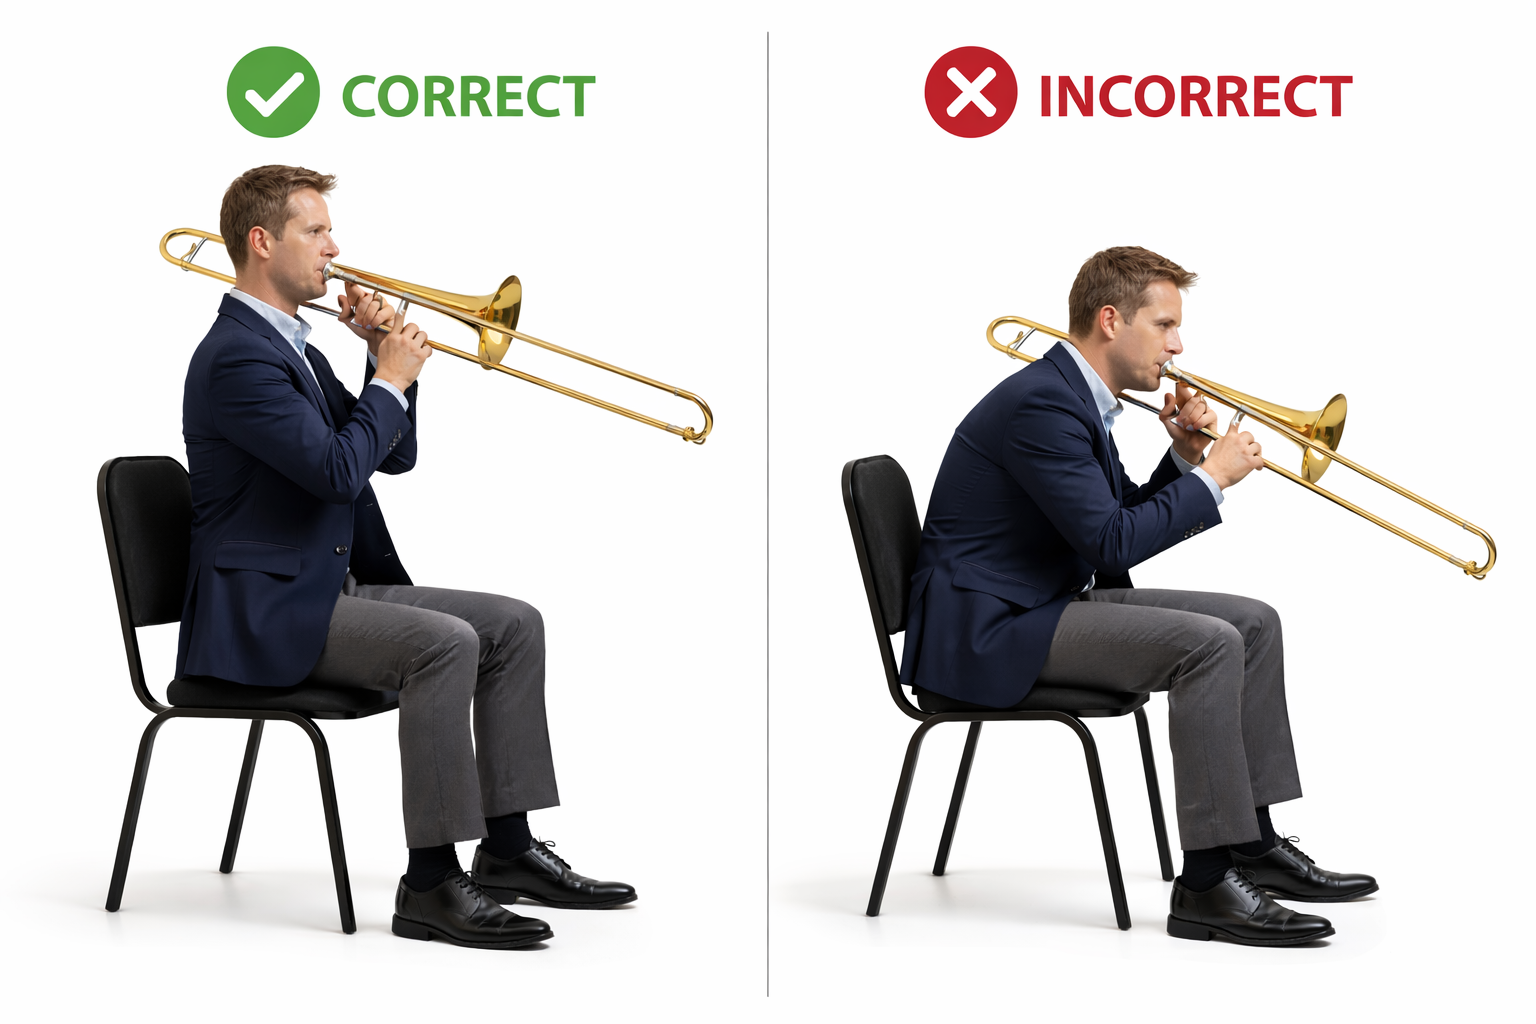
Step 3: Proper Trombone Playing Posture
Good posture improves tone, airflow, and control.
Seated Posture
- Sit tall near the front of the chair.
- Keep both feet flat on the floor.
- Avoid leaning forward.
Standing Posture
- Stand straight with shoulders relaxed.
- Keep the bell of the trombone level.
Step 4: Forming the Trombone Embouchure
Your embouchure is the way your lips and facial muscles interact with the mouthpiece.
- Say the letter “M” to shape your lips.
- Keep the corners firm and the center relaxed.
- Center the mouthpiece on the lips.
Beginner Exercise: Buzz gently on the mouthpiece before playing the instrument.
Step 5: Producing Your First Sound
If you were driving a car and it wouldn’t start, there’s a good chance there isn’t any gas in the tank. The same idea applies when learning how to play the trombone. The “fuel” that powers your trombone sound is air — and the best part is that it’s completely free!
Every time you play the trombone, remember that your instrument needs plenty of air to produce a strong, clear sound.
Let’s start with a simple exercise.
First, take your tongue and gently touch the area just behind your top teeth. Now hold your tongue there and say the syllable “tu.”
Let’s try that again so you can feel how it works.
Next, take your mouthpiece and place it gently on your lips. Keep the corners of your lips firm and relaxed at the same time.
Now take a big breath and blow into the mouthpiece while saying “tu” for four counts.
How did you do?
Try it again if you’d like a little more practice. The goal here is to use your tongue to start the air while keeping the airflow steady and strong.
This simple exercise helps you learn two important skills:
-
How to start a note clearly with your tongue
-
How to support the sound with steady air
Both of these skills are essential for playing the trombone well.
Step 6: Understanding Trombone Slide Positions
The trombone uses seven main slide positions. Moving the slide changes the pitch. Learning them is essential for beginners.
|
Position |
Common Beginner Notes |
|
1st |
Bb, F |
|
2nd |
A / E |
|
3rd |
Ab / Eb |
|
4th |
G / D |
|
5th |
Gb / Db |
|
6th |
F / C |
|
7th |
E / B |
Step 7: First Notes to Practice
The exercise below, uses just three pitches (notes): Bb, F, and Bb. Make sure that your slide lock in in place so that your slide doesn’t get away from you. If you are new to everything about the trombone and music notation, read about How to Read Notes in Bass Clef: Beginner’s Guide.
How to Play This Exercise
Take a deep breath and play the first two measures. Remember to say the syllable “tu” for each note.These are whole notes that are played for four beats each.
- Bb (first position)
- F (first position)
- Eb (third position)
The next measure is a four beat rest (whole rest). This gives you time to take another deep breath. Play the next two measures the same as the first two. They should sound identical. Rest for four counts.
Our new note is called “F” and is a higher pitch than the Bb. Slightly, tighten the corner of your lips and put air behind the sound. I think you are getting the picture.
In measure 16, we are going to test your ability to play eight beats of sound in one breath. Take a deep breath, say “tu” for eight counts. You will repeat this on the higher Bb note, rest for one measure and repeat the process on the low Bb.
The rest of this exercise is self-explanatory. The key is fuel for the trombone – AIR!
Practice Trombone for Beginners - Warmup #1Step 8: Trombone Notes and Slide Position Exercises
In the series of exercises, you will learn about six of the seven slide positions on the trombone. To play the first exercise, make sure that you do three important things:
- Take a big breath.
- Say the syllable “tu” when starting a note.
- Push the air through the trombone, not just into it.
We are learning many of the notes in the lower range of the trombone. Refer to Trombone Notes and Slide Positions: Beginners Guide
This set of exercises reinforces what we have already learned. Memorize the notes and their names. Remember, much of what we do when learning how to play the trombone is very repetitive for a reason. The more you do these exercises correctly, the faster you improve your skills.
Trombone Notes and PositionsYour First 4 Weeks Trombone Practice Plan
One of the most valuable lessons I learned years ago is the importance of having a solid Plan A—and a reliable Plan B to support it. This principle applies perfectly to practicing the trombone.
When you approach your practice sessions with a clear plan, you give yourself a structure for improvement. A well-organized practice routine helps you focus on the right skills, build consistency, and make steady progress.
Practicing without a plan, on the other hand, often leads to frustration and slow progress. Without direction, it becomes easy to lose motivation or develop poor habits. Having a thoughtful practice plan keeps you moving forward and greatly increases your chances of long-term success on the trombone.
Your Trombone Method Book
One of the most important tools for practicing the trombone is a reliable method book. A well-structured method book provides a clear path for developing fundamental skills and organizing daily practice.
One of the most widely recommended books is Arban’s Method for Trombone. This classic method begins with the fundamentals and gradually guides the player through the essential techniques needed for strong trombone playing. By following the exercises in a logical sequence, students can steadily build tone, articulation, flexibility, and technical control.
In my “First 4 Weeks Trombone Practice Plan”, I will suggest exercises to practice from the Arban Method. I definitely recommend that you purchase this trombone method as your main resource for skill development.
First Week
During your first week of practice, your primary goal should be developing a clear, steady tone on the trombone. This begins with establishing a consistent daily warm-up routine that prepares your air, embouchure, and sound.
At the start of every practice session, play the three warm-up exercise sets included in this article. These exercises are designed to help you build strong fundamentals and develop control of your sound. Follow the instructions carefully and concentrate on producing a relaxed, full tone with steady airflow.
By repeating this routine every day, you will begin building the essential foundation needed for successful trombone playing. Consistency during this first week is far more important than practicing for long periods of time. Even short, focused sessions will produce excellent results when done regularly.
After your warm up period, you can turn to page 14 in in the Arban’s Method. Practice exercises 1, 2, and 3.
Second Week
Your first goal during the second week is to continue improving your trombone tone. As always, begin every practice session with a slow and relaxed warm-up. Repeat the warm-up exercises from Week 1. Over time, you will begin to memorize these exercises, and they will naturally become part of your regular practice routine. Plan to spend about 5–10 minutes on this warm-up each day.
Your second goal is to begin developing smooth slide movement. In your Arban’s Method for Trombone, practice Exercises 4, 5, 6, and 7. These exercises help develop slide coordination and gradually begin extending your playing range.
Pay close attention to the markings placed above certain notes. These are called accents, which indicate that the note should be played with a slight emphasis. Apply this emphasis consistently throughout the exercise. You will also notice that the exercises on the first few pages include slide position numbers above each note, which serve as a helpful guide for learning accurate slide placement.
Third Week
Fourth Week
By the fourth week, you should continue building consistency with your warm-up routine. Begin each practice session with the same core exercises that have been helping you develop tone, air control, and embouchure strength. Establishing a reliable warm-up habit will make every practice session more productive.
This week you will also begin learning three major scales. Scales are one of the most important building blocks of brass playing and will play a major role in your future musical development. They strengthen slide accuracy, improve tone consistency, and help you understand how music is organized.
The B♭ Major Scale
Your first scale is the B♭ Major Scale. Below you will find the scale along with several exercises designed to help you become comfortable with the notes and slide positions.
In the first exercise, each note is labeled with both its name and slide position. Practice these slowly and focus on producing a clear, steady tone on every note.
Exercises 3 and 4 use the notes of the Bb Major Scale. You will notice that the notes are not named and there no slide positions. This requires you to learn these faster.
In exercise 4, notice that the flat (b) symbol is missing on some of the notes. This is intentional. At the beginning of the staff you will see two flat symbols, called a key signature. A key signature is a form of musical shorthand that tells you which notes are automatically altered throughout the piece.
For the key of B♭ Major:
-
Every B becomes B♭
-
Every E becomes E♭
These are the notes of the B♭ Major Scale:
B♭ – C – D – E♭ – F – G – A – B♭
Play the exercises slowly and listen carefully for a steady tone and accurate slide positions.
The F Major Scale
Your second scale this week is the F Major Scale. This scale contains one flat in the key signature: B♭. As you practice, remember that every written B must be played as B♭.
Practicing this scale will further develop your slide accuracy and help reinforce the concept of key signatures.
Notes of the F Major Scale:
F – G – A – B♭ – C – D – E – F
The E♭ Major Scale
The third scale you will learn is the E♭ Major Scale. This key contains three flats in the key signature: B♭, E♭, and A♭.
As you play through the exercises, watch for these notes and apply the flats automatically. This scale will challenge your slide coordination while continuing to strengthen your tone and musical awareness.
Notes of the E♭ Major Scale:
E♭ – F – G – A♭ – B♭ – C – D – E♭
Step 9: Common Beginner Mistakes
- Using too much mouthpiece pressure
- Poor posture
- Gripping the slide too tightly
- Not using enough air
- Moving the slide too slowly
Step 10: Essential Practice Tools for Trombone Players
Using the right practice tools helps trombonists develop strong fundamentals, maintain consistent progress, and practice more efficiently. The following tools support the core skills required for successful trombone playing: tone production, pitch accuracy, rhythm, listening, posture, and instrument care.
Metronome/Chromatic Tuner
A metronome is essential for building consistent timing and rhythmic accuracy. Trombone players must coordinate breathing, slide movement, and articulation while maintaining steady tempo.
A chromatic tuner is one of the most valuable tools for trombone players. Because the trombone has no valves or keys that lock in pitch, players must constantly adjust the slide to play in tune. A tuner provides immediate feedback that helps develop accurate slide placement and stronger listening skills.
There are many metronomes as well as chromatic tuners available at various prices. I have be using the Korg TM-70T Tuner and Metronome combination machine.
Trombone Practice Mute
A practice mute allows trombonists to practice quietly while still working on tone production and technique. This is especially useful for players who live in apartments, dorms, or shared spaces. Two of the best are the: Denis Wick Trombone Practice Mute and the Humes a Berg Trombone Practice Mute.
Benefits:
-
Reduces playing volume significantly
-
Allows more frequent practice without disturbing others
-
Keeps the embouchure active during quiet practice sessions
Music Stand
A good music stand helps maintain proper posture during practice. Holding music or placing it on a chair can lead to poor playing position and unnecessary tension.
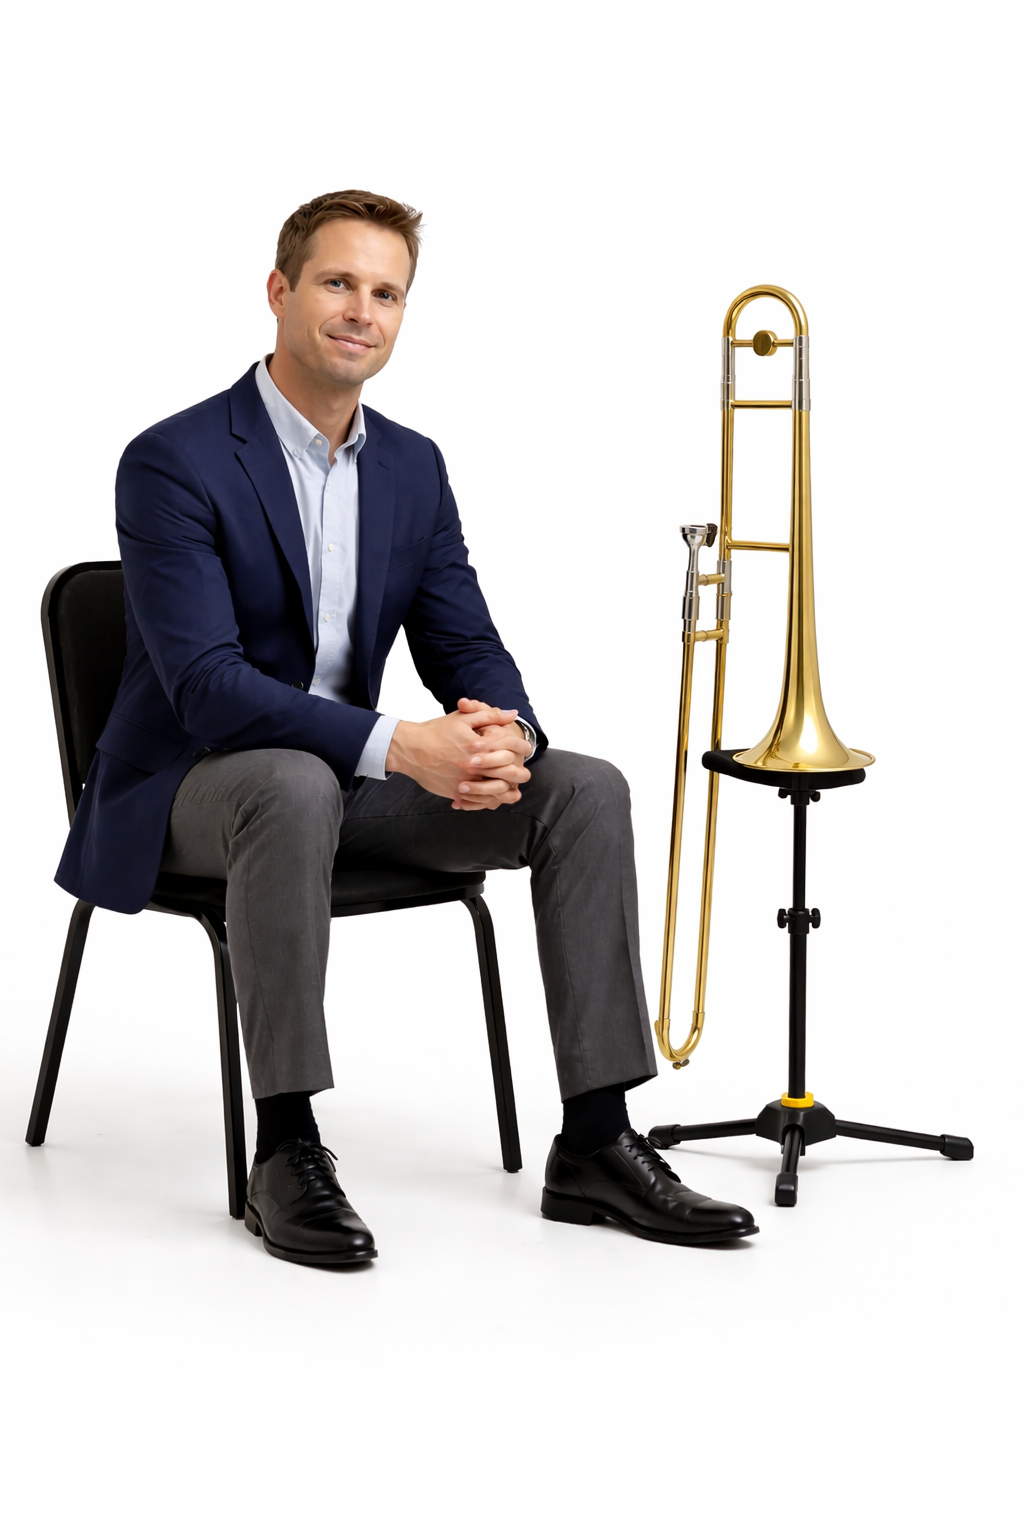
Trombone Stand
A trombone stand is a very practical tool during practice sessions, rehearsals, and performances. It allows the instrument to remain safely upright and easily accessible when taking breaks.
Benefits:
-
Protects the instrument from accidental damage
-
Allows quick access during practice
-
Prevents placing the trombone on chairs or floors
Trombone Slide Lubricant
Smooth slide movement is essential for accurate technique. Proper lubrication ensures the slide moves freely and quickly between positions. Super slick slide cream
Cleaning Supplies
Regular maintenance keeps the trombone functioning properly. Basic cleaning supplies help remove moisture and buildup that can affect slide performance and sound quality. I recommend a trombone maintenance kit to keep your trombone clean and in good working order.
Frequently Asked Questions
Q: How long does it take to learn trombone?
A: With regular practice, beginners can play simple songs within 1–2 months.
Q: Is trombone hard to learn?
A: It takes patience, but following step-by-step instructions makes learning easy.
Q: How often should beginners practice?
A: 20-30 minutes per day is a good start.
Q: What is the easiest note to play on trombone?
A: Bb in first position is the easiest starting note.
Ready to Take Your Trombone Playing to the Next Level?
Whether you’re a complete beginner or looking to refine your skills, personalized guidance can make all the difference. Private lessons with The Trombone Mentor give you step-by-step instruction, customized practice plans, and expert feedback designed to help you improve faster and play with confidence.
Start making real progress today — schedule your private lesson and discover how enjoyable learning trombone can be with the right support. CONTACT me for more details.
Final Thoughts
Learning to play the trombone is a rewarding journey that takes patience, good fundamentals, and consistent practice. By working through this step-by-step guide, beginners can begin developing a clear tone, accurate slide movement, and the confidence to play their first songs.
Remember that progress comes from small, consistent practice sessions. Even a few focused minutes each day will gradually build the strength, control, and musical understanding needed to become a strong trombone player.
Don’t feel the need to master everything at once. This guide contains a lot of important material, and it is meant to be used as an ongoing reference. Return to it often as you practice and continue developing your skills.
With patience, determination, and the right approach, anyone can learn to play the trombone well. Take it one step at a time, enjoy the process, and celebrate the progress you make along the way.
Related Trombone Articles
Trombone Practice: How to Set Up the Perfect Practice Space
Bill Watrous: Jazz Trombone Virtuoso and Studio Legend
Best Beginner Trombones Under $300 (Complete Buyer’s Guide)